Saturday, November 17, 2012

The Official Rinoa Heartilly's Duster Pattern

 
Rinoa Heartilly's Duster and Armwarmers


Supplies:

Size 2 (2.75 mm) knitting needles (I strongly recommend 14” length for at least the back panel)
Size 2 (2.75 mm) double pointed needles
yarn needle
white fabric paint
two small silver buttons (The ones I used were 1/2” across)

Yarn
I used Knitpicks.com Shine Sport in Sky, 60% Pima Cotton, 40% Modal® natural beech wood fiber. Anything would be fine as long as it's sport weight. For my length I used 20 skeins of yarn. Online is definitely the cheapest way to go when buying that much yarn. Knitpicks.com is an excellent source, and so is elann.com. Because of the ribbed fabric, I might recommend you use a wool yarn so you can block it flat and have it stay, but I really liked the look of the cotton yarn.

This jacket is a size medium tall, made to fit my medium sized 6' tall frame.


Gauge: 10 rows to an inch, 6 sts to an inch.

Abbreviations:
CO- cast on                   pfb- purl front and back
k- knit                            kfb- knit front and back
p- purl                            sts- stitches


The Armwarmers


CO 60 sts onto three double pointed needles.
Join, knit 2, purl 2 all the way around.
Continue until desired length. 
They took about one skein each. 
Cast off using whatever stretchy bind off you're most comfortable with. I used Jeny's Surprisingly Stretchy Bind Off. (Site with description of bind off technique: http://www.knitty.com/ISSUEfall09/FEATjssbo.php)

Mine were 11 1/4” long. It is not necessary to taper the tube to fit your arm, the ribbed pattern will keep them snug.


The Duster  

The Front Panel (Make 2)

CO 16 sts on to straight needles
knit 2, Purl 2 for 6”

start increasing here. (if you have a preferred increasing technique, feel free to use it. This is just the one I used.)

K2, p2 until the last two sts, pfb the last two stitches.
K2, p2 back across
k2, p2 until the last two stitches, kfb the last two.
P2, k2 back across.

Continue until you've increased to 44 sts. Remember to always increase on the same side. Make sure you're paying attention to whether you're starting with a knit or a purl on the next row after increasing.


At 44 sts your piece should be about 10” long.

Continue knitting without increases until piece reaches from shoulder to ankle. This was 56 ½” total for me. It took about three skeins of yarn.
( I am TALL. Although once it was done I wished it was a bit longer. Make sure you adjust this for yourself.)
I did not bind off any pieces until I had all 3 seamed together so I could make sure they were all the same length, since I didn't count rows.
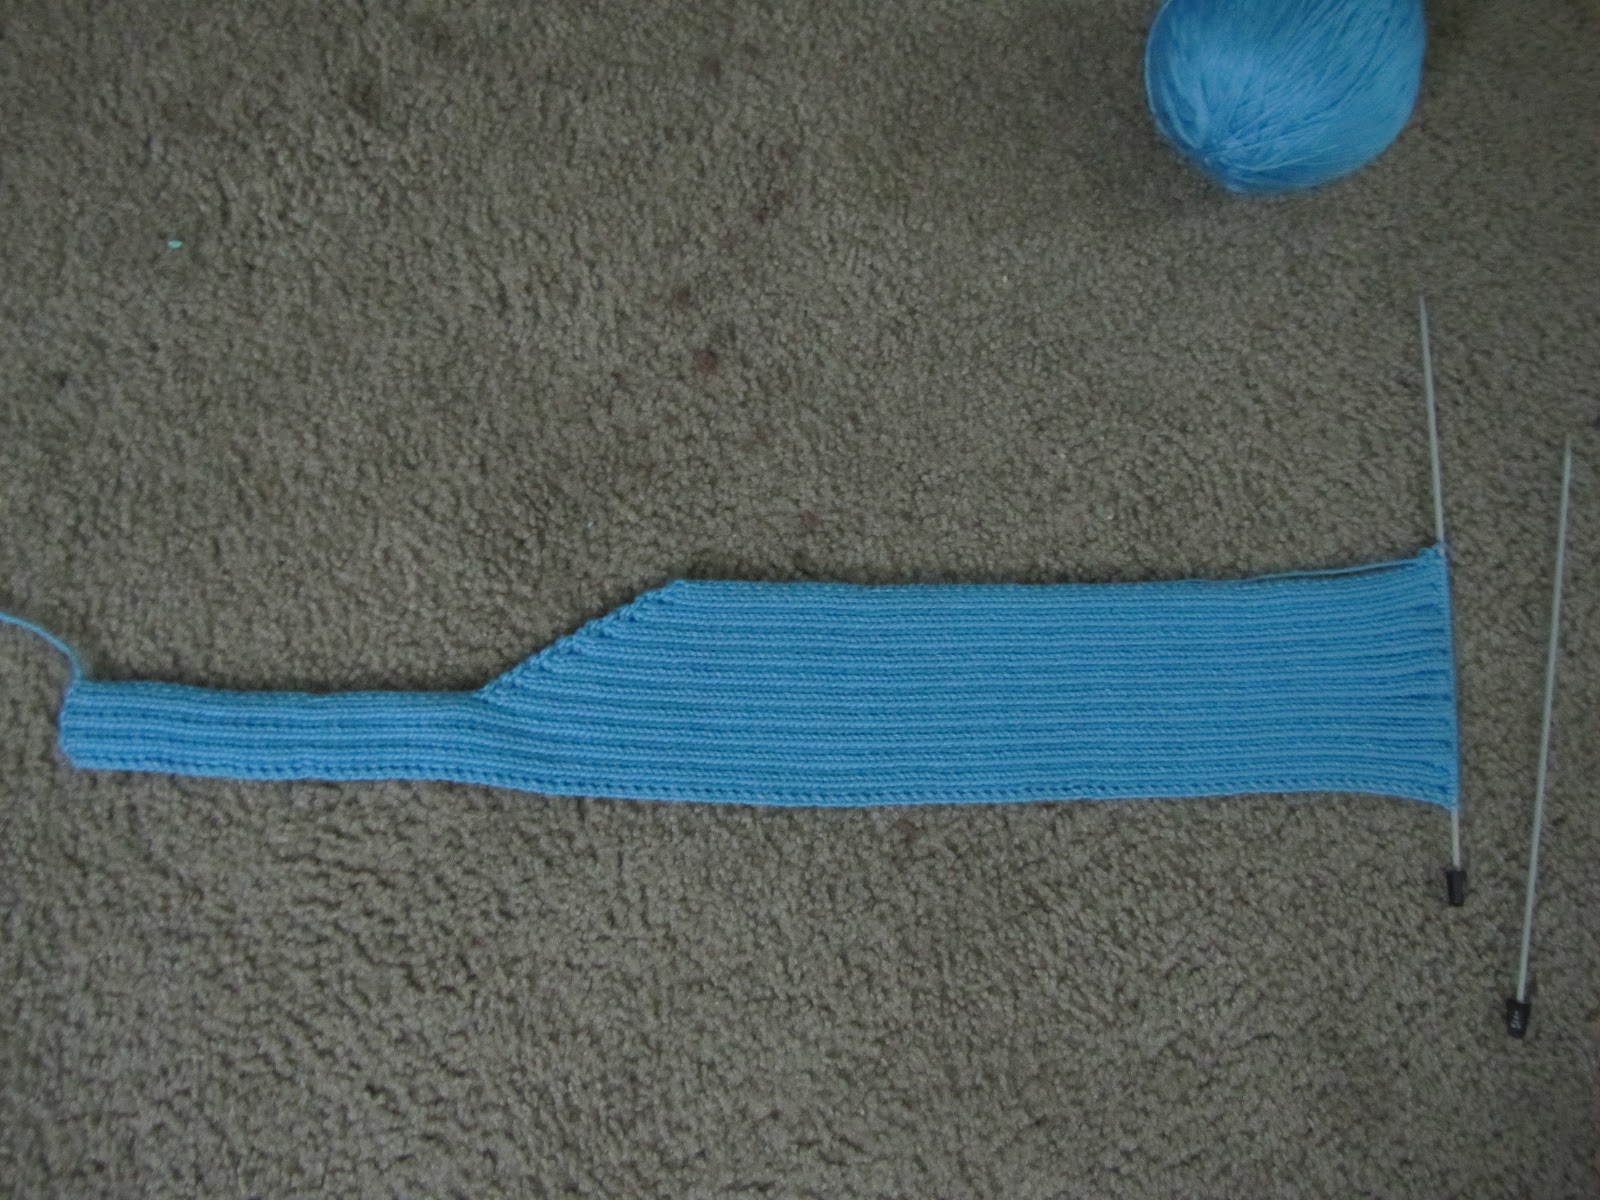
The Back Panel (Make One)

This is a wide piece, I strongly recommend having 14” long needles for this.

CO 16 sts each from two different balls of yarn. to start with it's gonna be two separate pieces, doing it like this makes sure they're the same length. (Pictures are done with different colored yarn to illustrate what I was doing.)

k2, p2 across both pieces each with their own yarn, for about three inches. so you'll have two completely independent pieces just hanging off the same needle.

 
kfb/pfb depending on what's needed on the last two sts of the first piece on the needle and the first two sts of the second piece. so towards the inside, increasing the pieces towards each other. keep doing this every row until the pieces together measure about 11"-12" across together. that's about the comfortable length to go across my shoulders. I increased each piece to 42 sts.


to join the pieces, do one more row of increases, except after knitting across the first piece, instead of using the working yarn from the second piece to knit it, carry the yarn over from the first piece. pull it tight so there's no gap.
k2, p2 one row after the join to solidify it. piece was 4 1/2" long, about 11" across.

Now, you increase the outsides to go down across your back and under you arms. Increases must be finished when the piece is 10” long to match up with the front panels.

Plain row means k2 p2 across without any increases
increase means kfb/pfb the first and last stitch of that row.

plain row
plain row
increase
plain
plain
increase
plain
plain
increase piece was 5 1/2" long.
plain <---- one inch

plain
plain
increase
plain
plain
plain
increase
plain
plain
plain
plain <--- two inches (eleventh row is extra to make up the length) 6 7/8" long

increase
plain
plain
plain
increase
plain
plain
plain
increase
plain
plain <--- three inches, just shy of 8" long

plain
plain
increase
plain
plain
plain
increase
plain
plain
plain <--- four inches. no need for an extra row. 9 1/8" long

increase 1 st on each side (to make sure we have a complete bar of ribbing)
plain
increase 2 sts on each side
plain
increase 2
plain
increase 2
plain
increase 2 <--- 10" long and 128 sts across.

I realize the increases are unevenly split on the rows, feel free to change this if it bothers you, as long as you have the same number of increases. Do not change the last inch of increases, it is important for the shape to have more increases in the last inch. This is what worked for me.

Again, make sure you're paying attention to whether you're starting with a knit or a purl on the next row after increasing. Since you're only increasing one stitch on each side for the first few inches it's going to be a little strange. Pay attention.

After the final increase row, continue to knit without increases until piece is desired length.  This took about 9 skeins of yarn.


Once pieces are done, seam together using the mattress stitch. I was very careful to pick places for the seams so as to not interrupt the ribbed pattern. This will be awkward if you didn't bind off to make sure that all three pieces lined up. Once you're sure, bind off using the same stretchy bind off you used for the armwarmers. Wash and block.

BLOCKING STRONGLY RECOMMENDED. The nature of ribbed fabric is to pull in, so these pieces will look small. Blocking will set the stitches and stretch out the ribbing so it looks nice. Blocking also provides a perfect opportunity to paint the wings on the back of the jacket.
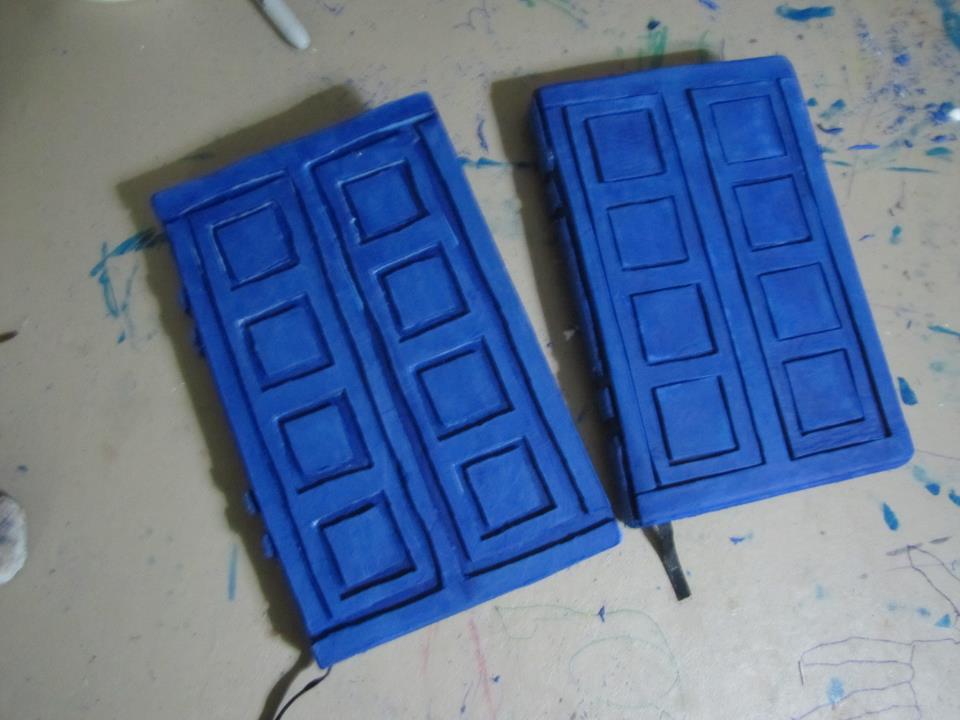
The Wings

A few notes. I opted to paint them on because that is how it looks to me in shots from the game.
Looks like paint to me.

The image I used for my stencil can be found here: http://www.cosplay.com/showthread.php?t=129189
in the first response from Leradny she has a link to the image. I've included it here just in case. I stretched the image until it took up the entire page. That size seemed to match best to me. Also, make sure to place the wings fairly close to the neckline, they're supposed to go across your shoulder blades.


My method was to paint it on with a sponge using the stencil, but this smudged the details quite a bit. I would suggest adding a bit of water to the paint and using a spray bottle to spritz the paint on. I have a theory that this would go on cleaner. Keep in mind, I have not tried this. I cleaned up my wings by mixing a bit of blue with the white and painting in the smudged details.
Blocking is the perfect time to do this, once it's dry, because it's all pinned down, stretched out and secure.


Stitch the two shoulder straps together once everything is dry. I used a basic whip stitch.

The Trim

CO 8 sts
Knit in stockinette until desired length.
It took two and a little more skeins of yarn for all of it.

you will need three pieces, one long piece to go around the front and neckline of the jacket and two to go around the sleeve openings.
once the pieces are long enough to fit, (length will vary depending on how long you made your jacket.) stitch the two edges together with the knit side out. The fabric will be curling this way naturally because of the way stockinette curls.

Sew the flattened tubes around the edges of the jacket.


For the strips that close the jacket in front make one more small strip the same way about 6” long. This one will be the one you sew the buttons on.

For the strip with the buttonholes, make another strip with the buttonholes at 1 ½” and 3 ½”. Strictly speaking two buttonholes aren't necessary, if you just to one, center it on the piece. For my buttons I made the buttonholes 5 rows long. Vertical buttonholes simply involve switching to a new ball of yarn halfway through to row to create a separation. When I sewed the edges together on the back I simply stitched the edges to the edge of the buttonhole on the front to leave it open.

If ypu have a different method for making buttonholes, feel free. This is just how I did it.


Now you're done! Get a black v neck tank top, a denim skirt and black shorts and go save the world with your knight!


If you have any issues please feel free to contact me, either by commenting, or through my Ravelry account, which is linked in my sidebar. Have fun!

Thursday, November 15, 2012

Here it is!

It's done.  It's finally done.  The trim seemed to take FOREVER.  I suppose, looking at the dates of my posts, it did take a little over two weeks.  I would not have thought it would take that long.


For the trim, I basically knitted a long strip of fabric, 8 stitches across, stockinette stitch, for what felt like a million miles, to go around the front and neckline and the edges of both sleeves.  Stockinette curls up anyways, so it was forming itself into a tube, so I just sewed it shut and then sewed the tube along the edges.

(I do have a minor problem I'm trying to ignore, but I think I'm gonna end up having to fix it.  I didn't measure how long I made the tubes for the sleeves, I figured holding it up to the opening would mean I'd end up pretty much the same on both sides, but I didn't account for knitted fabric's irritating tendency to be entirely different shapes and sizes and different times.  As a result, one sleeve is smaller than the other.  It's not visible when I wear it, but I can feel that one armhole is tighter.  I can detach it and fix it, but it will be a pain.  so, for your reference, I strongly recommend making sure both sleeve pieces are the same size.  which should have been common sense.  sigh.)

The strip for the buttons on the front is the same thing.  sewed the buttons on one and did vertical buttonholes on the other.

Random detail note:  these buttons are smaller versions of the exact same ones I used on the front of my skirt for the rest of Rinoa's outfit so they'll match perfectly.


so there it is.  Took a little over a year, if you include the long hiatus I took.  Five months of real solid work.


It took about two skeins of yarn to do all the trim, plus the ends of other skeins that didn't quite get finished.  so I used almost exactly 19 skeins for this. 

Literally.  this picture I took immediately after finishing at work this morning.  This is the yarn I had left.


So I think I will organize my notes and put together a pattern of sorts for Ravelry, and then not knit again for a long time.

ADFKJGASDFKJLKJHGALKJSDF

THE JACKET.  IT'S DONE.

more info later.  now I just feel like crying from relief.

Wednesday, November 14, 2012

Hey, look, clothes!

A random clothing post for ya, I haven't had one in a while.  I got in to another of Crowdtap's Old Navy sample shares.  this time it was for dresses.  I only got one coupon to share, so I took Amanda.  I was kinda surprised by our selections.  I thought I would get a sweater dress, maybe one of the cowl neck ones, but then I found this:


and I completely loved it.  admittedly it's noticably shorter on me than it is on the model, but that's what I get for being 6 feet tall.  it's really cute and festive.  I still had a $10 gift card to Old Navy so I bought some cute cable knit tights too.

Amanda, however, did go for the sweater dress, which is really weird, cuz that's never been her taste.  Hers is the one below, except hers was pink and brown striped.  couldn't find a picture of her colors.  but it looked really cute on her with her brown fuzzy boots.   


anyways, we were both pleased.  I love shopping and not spending money!

Wednesday, October 31, 2012

holy hell, isn't this done yet?

so... tired... of knitting.... I want to take a break so bad... but I'm so close... I'm just knitting the trim, and then I'll be done.  but I'm so tired! I'm not gonna knit again for months once I'm done with this.  I need a break.

Sunday, October 28, 2012

Pretty noticable progress.

so here's the three jacket pieces seamed together.  I learned to do the mattress stitch for this, which I really liked.  nice clean invisible seam.


Blocking it was a problem, cuz the thing is big.  in the end I just laid out some garbage bags.  I washed it and then pinned it out.  it took about a day to dry.

there's a tiny part of me that wishes I'd knitted in wool, since you never have to reblock wool...


Painted the wings on while it was still pinned down.  there's a few things I wish I'd done differently.  I printed out a stencil I found online and then painted over it with a sponge and a brush.  however the detail lines of the feathers of the wings got smudged and didn't come out very well.  in the end I had to mix in a little blue to the white and paint in the lines to get the details.  I'd thought about mixing some water with the paint and putting it in a little spray bottle, and I think that might have worked better.  And they should have been painted a bit higher up, closer to the edge.


The armwarmers were just at tube knitted on double pointed needles.  I cast on 60 stitches which was perfect, and they're 11 1/4" long.  each one took almost exactly one skein of yarn. I'd thought about decreasing to taper for my arm getting narrower, but I didn't want to do that and mess with the ribbed pattern.  I didn't need to anyways, because the ribs make sure it fits snugly all the way down my arm.


I have sewn the shoulders together, just a basic whip stitch. So now I'm just making the trim.  I have most of one skein left, and then the ends of a few others from the armwarmer and whatnot.  I have ordered more yarn just out of paranoia, and if I end up not needing it I can do the shrug I want for the fanart thing.  I ordered plenty for that.  and I got some more of the yarn I used for my River Tam vest, because Amanda wants one.   So, for the trim, I'm taking a very basic approach which may or may not work.  I'm knitting a long strip of fabric 8 stitches across in stockinette so it curls. I'll sew it together to make a tube, iron it flat and sew it on.  this is based on the suggestion that I got on the super pretty Rinoa cosplay I found that the trim looked like I-cord.  I did learn how to do it, but it doesn't seem like it works with as wide as I want it. honestly, the bits of yarn I have left will probably go further than I think, and I probably didn't need to get more yarn, but I really do want to do the shrug.

The wings are a bit too far down on the jacket.  they're closer to the middle of my back then my shoulders.  part of that is because the straps are pretty long.  I can shorten them, but I'm afraid of losing too much jacket length.  so I'll take a look at it and see what I think.  I don't think it's the end of the world.  It might be fixable, or it might just be fine the way it is.


Friday, October 26, 2012

River Song's Journal

So, I'm also a big Doctor Who fan.  Big.  I mean, I'm completely in love.  I cry regularly that the Doctor hasn't shown up yet to take me travelling with him.   The tenth Doctor is my favorite, how can you not love David Tennant?

Seriously, no human being has the right to be that cute.


Anyways, one of his on again off again companions is miss Queen of the Badasses, River Song.  She is awesome.  and she also does quite a bit of time travelling on her own.  And she and the Doctor are travelling in opposite directions on eachother's timeline.  Very confusing. They never know where the other one is, and what the other one has done.


As a result, River carries around a rather unique journal that she keeps track with, so that when she meets up with the Doctor, they can compare notes, figure out where they're at and know what they can talk about without causing spoilers.  Time travel and foreknowledge and all that jazz. 


Based on my previous posts, I'm assuming you see where I'm going with this.  I found a really good tutorial online for how to make this journal. 

Right here: http://storybooksong.tumblr.com/post/11131545977

And I WANTED it. 

It just so happened that weekend before last Caleb and Zach went out of town for a Grand Prix tournament for Magic.  Marissa and I got ditched.  Aaron and Amanda went too, so that meant I got to be the babysitter.  Luckily, we did get Caleb's parents to agree to take the girls one night so that I could have one night where I could do whatever I wanted.  And I suggested to Marissa that we do this.  she is also a big Doctor Who fan, we became fans together, watching it on Netflix.  She liked this plan. 

So, Corey had been spending a few days at our house because of a long weekend off of school.  He has just started Doctor Who, so he didn't know River yet, but he likes the show.  Friday afternoon I took Shannon and Eloise to Caldwell, and hit the craft store, leaving Corey happily playing Skyrim.  I ended up spending about $30 for the supplies to make two journals.  Marissa had offered to take me out to dinner that night, so I just paid for the supplies.  the journals were about $7 each, and then at the Hobby Lobby I found a big bag of scrap leather for $7.  IN TARDIS BLUE.  I about had a heart attack when I found affordable leather in the right color.  I was planning to paint over it anyways, but it was so much better to have the right color to begin with.  I didn't learn how much better until later.  I bought paint and glue as well. 

Anyways, that night we went to Chili's for dinner, Corey came too, and then we went to Hastings and rented Fright Night, because David Tennant is in it, and we hadn't seen it.  At home we watched a few episodes of Doctor Who first- Corey was right at the end of the first season, so he didn't really know David Tennant yet, so we just picked up where he was.  Plus the Ninth Doctor, Christopher Eccleston is very good, and David Tennant's first episode is my favorite.  I didn't mind.  I made margaritas and then we put in Fright Night and made these:

 Mine's the one with the bigger lines.  I feel we did a pretty good job.  Cutting the leather was AWFUL.  we used scissors and x-acto knives.  I found a spot on the base of my thumb where if it gets pushed on makes my whole thumb tingle like it's asleep.  and I hit it so hard my thumb was numb for two days.  I also bruised my hnd in various ways and had sore muscles from how hard I'd had to work to cut the leather.  We got out pumice stones and used those to rough the books up to make them look more worn- River's journal has clearly had the crap kiced out of it.  We scraped at the leather, the corners, the edges of the pages, everything.  I made some tea and mixed some cocoa in, which we sponged over the edges of the pages to make them look yellowed and older.  Marissa plans to just use hers for decoration, so she did a more accurate spine, which you can't really see.  When we were gluing the leather we realized really fast that stiff cheap leather would not allow the spine to bend if we did the correct looking spine.  Mine was originally an inverse of hers, with just small pieces glued on so I could actually use mine, but in the end I didn't like it.  I went back to the Hobby Lobby and got a small piece of soft, nicer leather and redid the spine so it looks much better.  It was then that I learned how good the blue leather was.  the new stuff I got was brown, and was impossible to rough up at all, because it just scraped the paint off, which I then had to repaint, which would smooth out the roughing.  I managed to get it a little beat up, but it wasn't easy.  It would have been a pain in the ASS to do that if all the leather had been a different color. 

Anyways, there they are.  and I love it.  I don't know what I'm going to write in mine, I'm terrible with journals.  But I'm gonna come up with something.

Friday, October 19, 2012

I'm a little scared.

Is it normal to be this terrified of finishing a project?  Seriously.  My jacket is scaring the hell out of me.  It took me more than a day to work myself up to actually seaming the pieces together.  And then I stressed for several more hours before binding it off.  To be fair, both were done using techniques I'd never done before, mattress stitch for the seams and Jeny's Surprisingly Stretchy Bind Off for the binding off.  But it's not like they were hard, and I've learned plenty of things off the internet  before.  I guess I'm just terrified of how this is going to turn out.  I'm so scared that this is going to get done and just look awful.  Or maybe not awful.  maybe just a little awkward and clearly homemade, which would almost be worse.  I've never worked this hard on a project I'm actually going to finish. I'm really good at starting projects and then never finishing them.  and this is one of the biggest projects I've ever done. I'm just really scared it's gonna be a waste of time.  A LOT of time.  and pain. and effort. and money, too.  I spent about $50 on just the yarn.  I mean, I've been planning and thinking and planning and thinking about this for a long time.  I mean, the Ravelry entry for it was made November 11, 2011, and that was when I bought  the yarn.  That doesn't take into account the months of planning and math and carefully examining pictures and frustrating online searches that went before that.  so in all, I've been working on this for more than a year.  Not straight through, obviously.  I've only be seriously knitting since July. still, though.  That's about four months. That's some serious devotion coming from me. I can't believe I haven't gotten bored and quit.  It helped that I had Amanda making fun of me and telling me I'd never finish, and Caleb actually caring about this.

and lets not even mention all the flaws I'm picking at in the piece.  (you know that means I'm going to anyways.) the biggest thing I'm worried about is the joins in the first front panel, the lumps caused by the russian and braided joins.  there's bumps in the fabric and I hate them.  only two there, though, after that I started just joining new balls at the edge so I could just tuck the ends into the seams and have no more lumps.  the seam does create an indent in the fabric, which I don't like, although I'm reasonably certain that will block out.  I'm afraid the straps are too long, or will stretch out too long under the weight of the jacket and leave giant gaps at my armpits. that can probably be fixed by just moving the seam on the straps though. 

hey, that was a shorter list than I thought.  which is good.  although the level to which the bumps in the fabric bother me make this list seem huge.

so now, all I have left is the armwarmers and the trim to knit.  and tuck in the ends.  oh, god there's so many ends to tuck in.  why are skeins so small?  and I need to block the jacket and paint the wings on.  I'm very nervous about the blocking, the only place I can think of where I'd have enough space to lay it out is out on the trampoline in the back yard, which has the added benefit of being a place where it will dry faster, but the idea of stretching this out and just leaving it out there makes me very uncomfortable. But it has to be blocked before I can paint the wings on.  I am deeply concerned about the future of this jacket, because I know from my tiny swatch piece, and what I've read about cotton that it won't hold the blocking through the wash.  It'll need to be laid out again after overy wash to keep the ribs lying down.  I really wish there was something I could do to make the blocking stay.  maybe I'll google it.

uhg, also another on the list of things about this that stress me- I think I may have made the first armwarmer too small.  I cast on 60 stitches based on the fact that my ribbed gauge is more like 6 sts per inch than 7.  and now I think I may have been wrong.  GRAAGRLE.

Tuesday, October 16, 2012

OMG!

 Jacket pieces done!  I'm so psyched. for some reason the third skein barely made it to the correct length, which made me a bit nervous, but we got there.  now I get to sew it together!  and paint the wings on!


.... and knit the armwarmers..... and the trim....

god I hope I have enough yarn.

Tuesday, October 2, 2012

second front panel

finished first skein of the second front panel. nothing thrilling.  getting really worried about having enough yarn though.

Thursday, September 27, 2012

Done with the back panel! I'm so fricking excited!

After the 9th skein: and done!
didn't use the full skein to get the length.
total length: 56 1/2"
leaving it hanging up overnight to get some stretching out of the way. and I haven't bound it off yet in case I need to adjust length.
4 1/2" from this skein to hit the final length.  you can see there's a bit of the skein left.


After the 8th skein:
51 and 7/8" long total
6" even out of this skein


aand, those are my cute little toes in the first picture.  :)  I cannot tell you how thrilled I am to be done with this piece.  seriously.  soooooo tedious.  I've started the second front panel now.  it only takes three skeins so it shouldn't take too long.  I gotta tell you, though, I'm really worried about having enough yarn for the trim. I'm hoping the armwarmers will only take one skein each, then I'll have one left, which I desperately hope is enough for trim. I don't want to have to order more.  I guess if I do I can order extra for the shrug for the fanart thing I mentioned.

incidentally, this is the fanart I was talking about:
(source:  http://jessami.deviantart.com/art/Excuse-Me-164912666 )

already have a denim skirt and black belt, would need to make the tank and figure out what to do about the black stockings.  and knit the shrug.  I really want to make it from the same yarn that I'm using now so the armwarmers I'm already going to make would match it. I can't have two different yarns, it would make me crazy.

I figure I can buy a black tank and add zippers, and make a stencil for the white design and paint it on.  I'll probably make the tank cover my tummy though, pregnancy and a tiny bit of weight gain have made me very unwilling to show my stomach.  I already have a pattern picked out for the shrug too.  maybe I should just order more yarn now.... sigh.


Monday, September 24, 2012

My Neighbor Totoro


This guy was my first major crochet project after I taught myself how to do it.  I really need to make one for myself...


11/25/11 Marissa loves Totoro- well, all Miyazaki
movies. and Marissa is one of those sweet undemanding people who don’t ever want anything, but when they do they buy it themselves. so, at a loss for Christmas, I was really excited when I found this. I’ve bought the yarn and I’m ready to go. She’ll love it.


11/28/11 went up a hook size to a 4.0mm. the yarn did NOT like being yanked around on that 3.5 hook, and as this is only the first of my Christmas projects I decided to take it easy on my hands.

12/1/11 Body done! not stuffed yet, but Im doing this at work, so I didn’t have my stuffing with me. I’ll probably have to undo and redo the last few rows to stuff him, but I wanted to get it cut off so I could start on the limbs. Put his eyes in too, I’m pretty happy with them.


12/3/11 Yeesh, I’m gonna have a hard time giving this guy away. body is all assembled, eyes, nose, belly, Vs on the belly. He’s so frickin’ cute! I also have his ears and one arm made. I’m using RowanLore’s mods to the pattern for the ears and arms with a few tweaks of my own- on the ears, in the two places it says to crochet straight around I added an extra row of crocheting straight around in each spot- just for a little extra length and shape. On the arms I actually quit two rows early on the crocheting straight around part. I held them up to him, and it just seemed long enough. At the rate I’m going though, I think he’s only gonna take 2 skiens of yarn, and I bought 4. I may need my own. it also occurred to me that I could take a big hook and my favorite super bulky yarn and make myself a giant totoro as well. I may need a full set of the three for myself. After Christmas, of course.

12/5/11 just need to sew him together….


12/5/11 all done! Isn’t he sweet? and I was right, I was excessively paranoid and it took almost exactly 2 skeins of yarn when I bought 4. which means I have enough left to make a whole Totoro for myself! Later, of course…..

Saturday, September 22, 2012

Finished my Ariel


She's all done!  took two separate two hour sessions of crocheting, and then about one hour to assemble.  She's so cute!  I love her so much! I could do these in one sitting easy. for these princess dolls I did get mostly the recommended yarn in the pattern, but for time and money and availability interests, I subbed a bit.  for instance, Ariel's tail- the light green is Simply Soft, but a different shade, the dark green is a Red Heart Super Saver.  and the hair is a different shade also.  not really a big deal.  I tried to work with my stash where I could, but I still had to buy a crapload of yarn for this, as my stash was very small.  only changed a few things in the pattern itself.

 first of all, in many places the pattern says to ch-1 at the beginning of the round and then work in the same space.  I had a bit of trouble understanding this. maybe I was missing something but this seemed to add an extra stitch.  I was probably just misunderstanding it.  so I ignored it and just crocheted into the next stitch.  didn't seem to create any visible differences.  her arms are so small I didn't even try to stuff them.  and I made her torso a bit longer, cuz with the bra and everything it just seemed too short.  I was using different yarn than the pattern calls for for the bra, it's Caron Simply Soft, and that may be heavier than what the pattern uses, I'm not sure, I'd have to look. it may have created a bigger bra taking up more of the body.  regardless, I just added about three rounds to the torso and it's fine.  also, my mermaid's bra is not detachable.  this is going to be a gift for my 6 year old.  a detachable bra would just get lost. so I just sewed it down.

also, in pictures the fins appear to be folded over a bit and sewn on that way.  I'm not quite sure how she got that, but I decided to leave mine flat.  I liked the bigger fins.

So, while I was working on this one night, my husband seemed very concered about the fact that I wasn't working on my Rinoa jacket.  He seems to actually care that I finish that. which is interesting.  I thought he was rather indifferent.  It was gratifying to know that he cares.  However, I'd worked an eight hour shift that day at my job, rather than my normal four hours, and I spent the entire time knitting.  I assured him I got plenty done that day, I just needed to do something different.

Thursday, September 20, 2012

Ariel, The Little Mermaid

 I found these patterns:

 http://www.etsy.com/shop/Sahrit

 and absolutely fell in love. So I bought them ALL and I’ve decided to make every one for my daughter for Christmas. (I've also harrassed the creator of them trying to convince her to do MORE Disney dolls, because these are STUPIDLY ADORABLE.)


  and I’ve started now, even though it’s a bit early. I don’t want to be rushed. I had to order eyes online to get ones small enough, and there’s not here yet, so I won’t be able to finish her just yet. But I got the tail and torso and arms done in about two hours or less last night. They’re not very big, so I don’t think this will take long.

info about any changes I made are in the next mermaid post.

Wednesday, September 19, 2012

Souleater, the Unicorn Prince of Darkness

Another little dude I made.  every time I look at him I'm reminded of how I really need to make more, because he's just so perfect.

11/25/11 This is for my 2 year old niece for Christmas. she loves ponies and this guy is adorable.

12/5/11 Got this one started now. I’m using a 3.5 hook for the bottom of the feet cuz the yarn that I’m using is some random scraps from an old project, and it’s heavier than the other yarn I’m using. this may cause oddness in the legs, or may add extra chibi cuteness with his excessively large feet. we’ll see how this works. using the 4.0 hook for the rest of him.

12/7/11 legs done. his feet are HUGE. it’s almost comical. I’m wondering if I should lengthen the legs to accomodate the feet. this guy’s gonna be all feet. hopefully it’ll be cute. Too late to change now, way too lazy! as a result of the giant feet the ruffle around his ankles sticks straight up his leg instead of down, but I think it’s okay. on to the head now.

12/8/11 Finished the head last night, and today I’ve gotten the body done and legs attached. I could finish him up now if I’d brought my stuffing to work…. I guess he’ll have to wait until I get home. Incidentally, I don’t know why I think he’s a boy. he’s clearly all done up in pink and purple, which should suggest feminine to me, but for some reason when I look at him, I still think “he”. shrug

12/8/11 He’s all done! I love him! His name is Souleater, the Unicorn Prince of Darkness, and he will punish you if you mock him. My husband and my brother were teasing me last night when working on his face, saying he was scary looking, like he was going to eat their souls, so when I finished him this morning, I made a sign for him saying, “My name is Souleater, and I will punish you for mocking me.” and put him on my husband’s alarm clock so he’d be staring at him when he woke up. it was funny. anyways, like I said, his feet are comically huge, and I regret doing purple for the rings around his eyes, I think that’s part of the creepy look he’s got. I wish I’d done yellow to match his horn and freckles, but I’m too scared of ruining it to mess with it. I like him anyways. He had kind of a fat neck thing going on, so I ran a line of stitches under his chin a pulled it in to define his chin and narrow his neck. it looked much better.
I assume my two year old niece will probably rename him, but he’ll always be Souleater to me….